|
|
|
1.
|
While it may be possible to
install this kit without removing the bed, it is recommended that
you do so, as it is much easier. Support the front and rear of the
chassis on jack stands. Be safe! Avoid pulling and pushing on the
vehicle while it is off the ground. |
|
2.
|
Remove the rear axle, springs, and
brackets. To remove the rivets holding the brackets, grind the rivet
heads flush. Center punch the rivet and drill through using
progressively larger drills up to a 5/16" drill. The rivet should be
relatively easy to punch out if it is not then continue drilling
with a 3/8" drill. Take care not to drill the original rivet holes
larger or off center, as you will be locating your new parts with
these holes. |
|
3.
|
Install the leaf spring brackets
on the outside and underside of each rail with the spring hole in
front |
|
|
'48-'52 pick-ups: The four holes
on the sides attach in the same manner as the originals and the
bottom hole must be drilled out. |
|
|
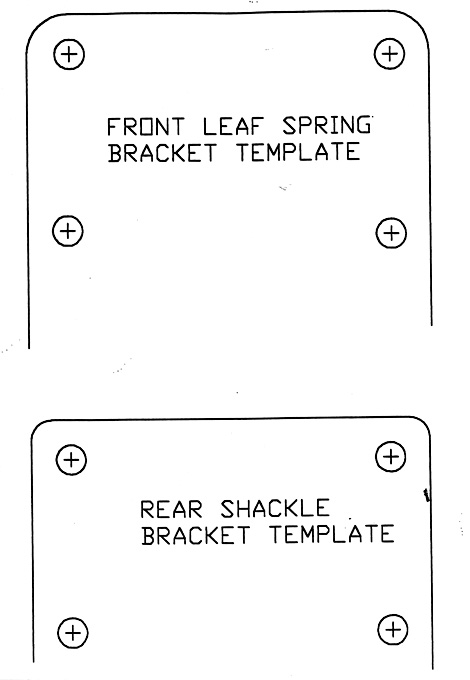
'53-'56 pick-ups: The holes for
the new bracket must be drilled. Using a square, make a line 1-1/2"
behind the front hole of where the old bracket was. Hold the bracket
up to the rail and line-up the top front hole on the line you just
made. Mark the two upper holes, set aside the bracket for now and
use the paper template to locate the lower holes. Drill the holes to
3/8" |
|
|
Fasten the brackets to the rails
using the 3/8-24xl-1/4" bolts, nylox nuts, and one washer under each
nut. It may be necessary to align-drill a couple of these holes. Use
the bracket as a template for drilling the bottom hole and fasten
with a 7/16-20 x 1" bolt, nut and washer combination. There should
now be 5 bolts holding on each bracket |
|
4.
|
Install the shackle brackets on
the outside and underside of each rail with the shackle hole towards
the rear. Line up the brackets with the original bracket holes on
the frame. It may be necessary to align-drill a couple of these
holes. |
|
|
'53-'56 pick-ups: The holes for
the new shackle brackets must also be drilled. Using a square, make
a line 1-1/2" in front of the front hole of where the old shackle
bracket was. Hold the bracket up to the rail and line-up the top
rear hole on the line you just made. Mark the two upper holes, set
aside the bracket for now and use the paper template to locate the
lower holes. Drill the holes to 3/8" |
|
|
Use four 3/8-24x1-1/4" bolts,
nylox nuts, and one washer under each nut to fasten each bracket.
Use the bracket as a template for drilling the bottom hole and
fasten with a 7/16-20 x 1" bolt, nut and washer combination. |
|
5.
|
Weld spring pads on the axle. The
spring centers are 37-1/8" and should angle the pinion 5º up. Most
people will skip this step for right now. |
|
6.
|
Install the springs. Use the
1/2-20x4" bolts and nylox nuts to fasten the front of the spring
into the front brackets. To make things easier, you may want to put
the rear-end an a floor jack and roll it into position, keeping it
raised and out of the way of the springs. Place the shackle bushings
into the spring eyes and the shackle bracket. Slide the shackle pins
through a shackle dog-bone and the bushings. Raise the rear of the
spring and attach to the bracket using the shackle dog-bones and
nylox nuts. |
|
7.
|
Set the rear-end onto the springs
with spring pads in between. Center the rear-end and clamp the axle
to the springs using the u-bolts, the 5-hole plates, and 1/2-20"
nylox nuts. The 5-hole plates are positioned under the spring with
the shock tabs pointing down on the inboard side and behind the
axle. Typically, the spring pads are 5º down from the pinion, but
just get this close for right now. Later, the final step will be to
set the vehicle an the ground and to check that the pinion angle is
1º lower than the transmission angle. The pads can be welded on
after the spring pad angle has been checked and repositioned if
necessary. |
|
8.
|
Draw a line 27-1/2" in front of
the rear bed bolt hole on top of each rail ('53-'56 pick-ups use
29-1/4"). Center the shock cross-member an the top of the rails and
mark the hole centers on the lines just drawn. Drill holes through
the rail. It is best to drill only the top of the rails and then set
the cross-member in place and use a transfer punch to mark the hole
centers an the bottom of the rail. |
|
9.
|
Install the shock cross-member
with the shock mounting tubes pointing forward and parallel to the
ground using the 5/8-18x4-1/2" bolts and nylox nuts with washers
under the bolt heads and nuts. Fasten the shock studs to the 5-hole
plates using the 1/2-20 nylox nuts. Install the shocks with the
remaining fasteners. |