62-67 Chevy Rear 4-Link Coil Over

PLEASE READ & understand these instructions before starting any work!

SUPPORT VEHICLE WITH JACK STANDS BEFORE DOING ANY WORK

!!Any welding should be done by a qualified welder!!


1. Start by raising the car and supporting it with jack stands.  Remove old suspension components (shocks, rear-end, leaf springs etc.)
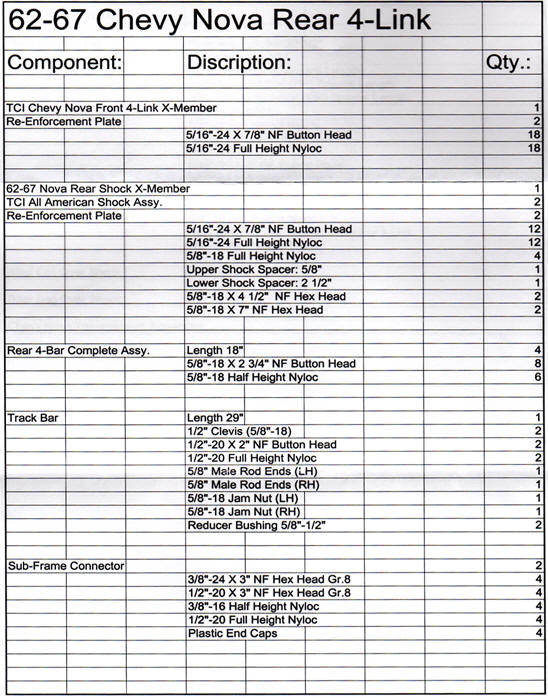
2. Start  by removing the un-used bracket from the vehicle (Fig.1) ie. E-brake bracket, rear bump stop bracket, front leaf spring hanger. When removing brackets drill out all the factory spot welds, and pry the brackets off. Do not force pry the bracket as it will damage the sheet metal.  Prepare the rail section making sure that the surface is free from any left over spot welds and un-even surfaces.

3. Cut the leaf spring hanger bracket making sure that it is flush to the rail.


4. Start by installing the 4-Link X-member (Fig.2).  Once in position, drill a couple of holes per side to set the X-member in place. With the supplied re-enforcement plate, mount plate inside the vehicle with a couple of bolts to secure them. Once the plate is secure you can drill the remaining holes from inside the vehicle.


5. Next, mount the sub-frame connectors in place (Fig.3). Using the supplied bolts fasten the two rear holes into the 40link x-member. Then raise the sub-frame connector into position, and making sure that the bracket is butted up against the floor boards. Once the sub-frame connector tubes are in position drill 4 3/8” holes through the front sub-frame using the tube bracket as a guide.


6. Next, install the rear shock x-member into position (shock x-member will only bolt in one way ) using the 4-link x-member as a reference measure  27 13/16” from the back face of the 4-link x-member to the front face shock x-member. Finish by drilling the mounting holes (6 per side).


7. Install the rear 4-bar (18” 0 deg.) into the x-member (adjuster mounts towards the frame) with the supplied fasteners (5/8-18 x 3 ¾)  mount the 4-link bar to the rear end. The track bar (29”) is mounted from the lower left (driver) of the frameside to the lower right of the rear-end (Fig.4a, 4b)


8. Once the 4-link is mounted we can begin to install the shocks. Start by mounting the upper shock to the x-member (5/8”- 18 x 4 ½ “) using the 5/8” spacer. Next, mount the lower shock (5/8”- 18 x 7”) with the 2 ½” long spacer to the rear end using the lower mounting hole position.


* Install axle bracket 30 ½” C-C 1 degree Pinion up. If necessary axle brackets may be cut to be installed on and existing rear end.  (see template)

TEMPLATE


 |  Search |  Illustrated Installation Guides  |  E-mail Us |  800-979-4278  |


800-979-4278